

Urban sketching turns everyday scenes into living art — and with this course I learn how to capture the world around me with confidence, style, and a splash of personality.
Urban Sketching Course – Part 1: Finding My Frame (and My Nerve)
This morning, I left the house at 8:30 AM sharp, which, let’s be honest, is not exactly my natural habitat as an artist 🎨. The course is held right in the heart of Rotterdam, at the Rotterdam Volksuniversiteit, a whole hour’s drive from my cozy home 🏡 in Zeeland. Luckily, my husband was kind enough to drive me there — we turned it into a little day trip.
We arrived way too early ⏰, but better that than fashionably late and stressed out. The building was easy to find, parking was a breeze (Rotterdam, you win this round), and once inside, I spotted our instructor — already present and looking very kind and approachable 😊. Promising!
As people slowly trickled in, casual chatter began, and when it came up that I had driven 🚗 all the way from Zeeland, the reactions were a mix of astonishment and confusion 😳. Apparently, crossing provincial borders for a course is a minor miracle in some circles. But hey — we Zeeland folks are used to driving far for anything remotely cultural. We’re practically nomads with sketchbooks ✏️.
Class started right on time at 10:00, even though not everyone had arrived yet — which I found mildly shocking 😅. I mean, who’s late to an art class you paid for?
Our first session focused on composition: the golden ratio and “coulissenlandschap” (a Dutch word for layered landscapes — kind of like stage sets). Thankfully, I’d heard of these before, so I wasn’t totally in the dark. Then came the tools of the day: tiny little passe-partouts in various shapes — square, rectangular, and panoramic 🖼️. The idea was to look through these frames to find your composition, then sketch what you see. Sounds fun, right?
One problem: we were sketching indoors due to the weather 🌧️, and the building’s narrow hallways weren’t exactly brimming with inspiration. And that tiny frame? It felt like trying to compose a masterpiece through a keyhole.
Back to the instructor I went. She kindly explained: "Hold the frame close to one eye — just like you’re taking a photo — and look through it with one eye closed 👁️."
Of course! Why didn’t I think of that? Probably because I was too busy panicking 😬. But that’s why I’m here — to learn.
Time to get to work. But oh boy, was it harder than I thought 😮💨. I always assumed I could draw reasonably well, but trying to compose something meaningful within that tiny frame felt nearly impossible. Eventually, I managed to get something on paper, though I’m not sure what exactly 🤔. I’ll finish it at home and bring it in next week for feedback.
And honestly? I’m a little nervous about that part 🫣. There’s this weird pressure that comes with being “an artist already” — like I should somehow be better than I feel right now. But I suppose that’s part of the journey too. Vulnerability, learning, letting go of ego... and yes, awkwardly squinting through cardboard windows👀.
To be continued.....

Urban Sketching Course – Part 2: Melting, Perspective, and a Missing Horizon
Today number two of my 8-part Urban Sketching adventure, and let me tell you — it was intense 😓. Not because of the drawing itself (though that had its moments), but because we were basically slow-cooked on the top floor of the university building 🌞🔥.
At 10 AM, it was still manageable: a toasty 26°C. But by 11, it had climbed to 30°C, and not long after, the air had turned into soup. Thick, hot, breathless soup 🥵.
Understandably, our instructor decided to skip the planned computer session. That would’ve meant moving to a different room — the kind with a giant sunbeam laser focused right through the window ☀️. Great for sunflowers🌻, not so much for humans.
So, we stayed put and got straight to work instead 🖊️.
The assignment: draw from a photo 🖼️. Now, I’m here to learn, and while I’ve got a bit of experience under my belt, I’m definitely not above getting stuck. And today? I did 🤷♀️.
My first hurdle came almost immediately: how do you apply perspective rules to a photo when you can’t even see the horizon line? I know how perspective drawing works — in theory — but photos don’t always play fair. My question was met with a very practical answer:
“Just imagine you’re the photographer. Step into their shoes, look through their eyes 👀. From that viewpoint, determine where the horizon line would be — that’s your starting point.”
Simple. Obvious, even — once you hear it. But not when your brain is melting and your sketchbook is sticking to your forearm 🫠.
By noon, I was totally drained. I’d already drunk a whole liter of water 💧, but it felt like my body had given up on regulating temperature altogether. It must have been pushing 35°C by then. At 12:15, I threw in the sweaty towel. I packed up, told myself I’d finish the drawing at home (hello, air conditioning ❄️), and made a strategic retreat 🏃♀️.
Next week, hopefully, the sun will chill — literally — and we can dive back in without needing survival gear 🏕️.
To be continued...


Urban Sketching – Week 3: Finding the Horizon (and Myself)
Today was already lesson number three of the Urban Sketching course! We left right on time — I love being early — and arrived a solid 25 minutes ahead of schedule. First ones there! Soon after, our instructor Marian and another early bird showed up, and we had a nice little chat.
Somehow, the topic turned to personality, and I was pegged as someone with a lot of self-confidence — and honestly? That’s spot on 😎. I’m not afraid to try new things or learn something completely different.
Upstairs we went — thankfully, the temperature was finally normal! 🌤️
But first: last week’s homework? ✅ Approved! Always a great feeling to hear you’re on the right track.
Today’s lesson was all about one-point perspective, with a tiny sneak peek into two-point perspective. Luckily, I already understood the basic principles, but there’s always that one nagging question:
How do you know where to place the horizon line in your drawing?
Well — mystery solved!
✔️ All lines above the horizon line angle downward
✔️ All lines below it angle upward
✔️ And wherever they cross… that’s your horizon line!
Makes sense when someone explains it, right? 🤯
I had another question — about spacing. When trees (or lampposts, or houses) line up toward the horizon, the objects get smaller, sure — but what about the spaces between them?
Great question, apparently — even the teacher said so 😄.
While I didn’t quite follow her explanation, Bo (an art student in the group) saved the day with a tiny sketch: by drawing Xs where the diagonals cross, you can find the position of the next object.
Simple… once you know it!
We then practiced this on a photocopied image and started building out a full sketch based on it. That’s my homework this week!
The vibe in class today was better, too. I’m not always great in group settings — not because I’m shy or insecure (I’ll speak up when I have something to say!) — but I’m more of an observer.
Especially when conversations drift toward things like gifted children and elite education… yeah, I tend to zone out a bit 💤.
But all in all: a good day, a great lesson, and another step forward in this creative journey.
To be continued…


Urban Sketching – Week 4: Hatch, Scribble, Dot... Repeat!
This week, once again, I left on time and arrived 25 minutes early — I like being the first one there 😄. I chatted with a few of the other ladies (it’s getting easier each week!), and at exactly 10:00 sharp, we kicked off the lesson — just how I like it! ⏰💯
Today's topic: shading techniques — or as our instructor called it:
✨ Handwriting for artists ✨
We practiced hatching, cross-hatching, scribbling, stippling, and playing with tonal value using both single and crossed lines.
Luckily, this wasn’t totally new for me, which made it even more fun.
My homework from last week also got some extra attention from the instructor. Since it wasn’t quite finished yet (see photo!), she gave it a closer look.
My main struggle? That curved line at the bottom of the buildings — the one filled with plant boxes, bikes, and general chaos 🌿🚲😵💫
But no worries — we’ll actually revisit this subject in a future class. For now, she said I did well overall 👏, but I should try to highlight a specific area more clearly.
Oh — and the challenge for this week?
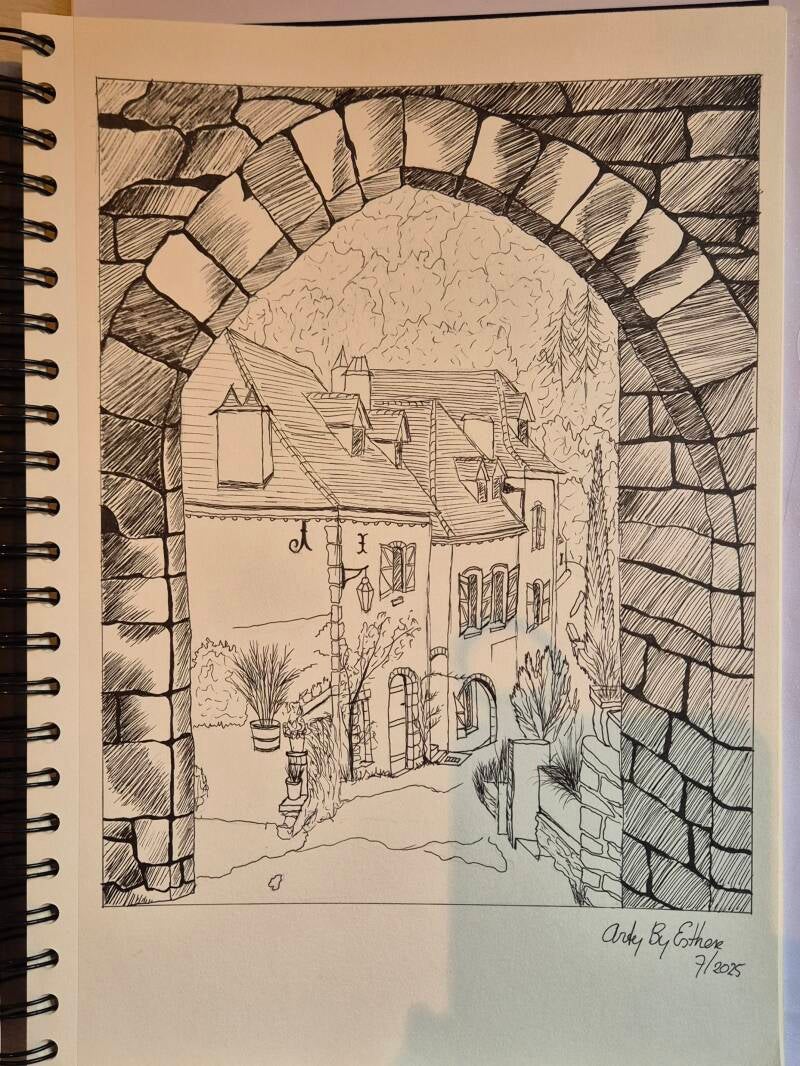
A framed view, like looking through an archway or alley into the distance.
But here's the twist: I have to choose where to place the focus. Should I let the eye be drawn to the framing element, or push the contrast and shading toward the buildings in the background?
All through the magic of arcering (shading). A subtle but powerful decision... and I love that kind of challenge! 👀✍️
Onward we go — step by step, line by line, and sometimes... one dot at a time 😉
To be continued...

Urban Sketching Course – Week 6: Green Chaos and Grey Tree Trunks 🌳🎨
Today I was finally back in class after missing last week’s session due to a hospital visit (I’m fine now, no worries 💪). The class I missed was all about color theory — which, let’s be honest, is kind of my comfort zone. So I didn’t feel too bad about missing that one. Still, I brought along my homework from two weeks ago and asked if our teacher could still take a look. She kindly agreed 🙏.
The sketch was a view through a gate (see picture above) — and while I was quite proud of how it turned out (especially that gate!), the feedback was that I had made the gate way too dominant 😅. Apparently, I overemphasized the structure that I thought made the scene. Ah well — art is subjective, and our instructor certainly knows her stuff, so I gladly took her critique on board. We’re here to grow, after all 🌱.
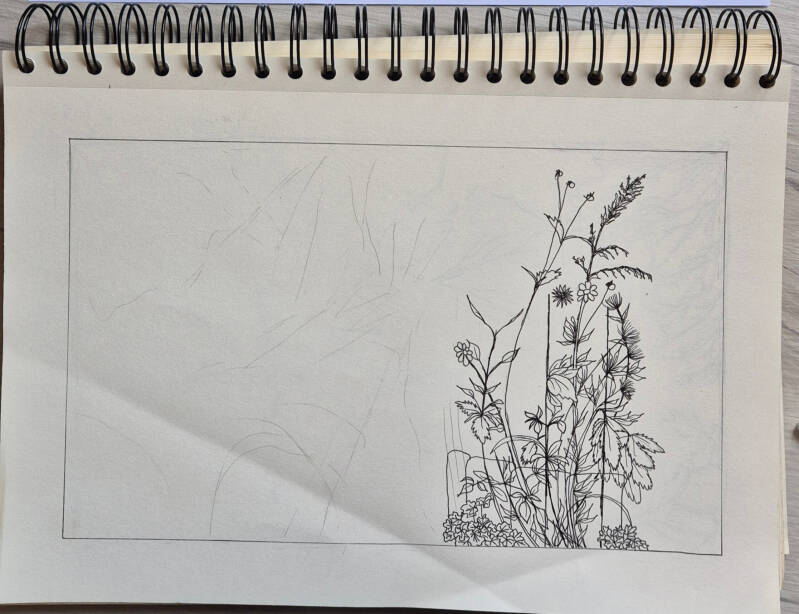
This week’s topic: plants, trees, flowers, and grass 🌼. We focused on how to draw nature — and more specifically, how not to just make everything "green and brown."
Trees, for example, should be drawn from the ground up. The trunks? People usually grab a brown pencil first, but our teacher pointed out that tree bark is more often greyish than brown . We were told to pay close attention to texture and the rhythm in the bark patterns. Leaves, on the other hand, are often drawn as random scribbles, but they actually tend to form clusters — sometimes like umbrellas ☂️, depending on the species. Light and shadow play a huge role here ☀️🌫️.
And don’t get me started on greens. There are a million of them. Warm greens, cool greens, blue greens, ochre-toned greens... 🎨 To tackle that overwhelming variety, we were encouraged to start with round shapes, then build up the forms and details gradually. Same goes for flowers.
Because the weather was finally cooperating, we went outside — into the lush, overgrown garden of the Volksuniversiteit 🪴. Sounds idyllic, right? It is... until you’re supposed to choose just one piece of it to draw.
As always happens to me in a group setting, I immediately felt overwhelmed 😵💫. Where to even begin? Every direction looked like a jungle. I stared, panicked slightly, and eventually just started drawing something. Anything. Experience tells me that if I just begin somewhere, things tend to work out — more or less — in the end. (Or at least, they look like I intended it that way 😄.)
I'll be continuing the drawing at home, in peace and quiet. Working alone suits me better when it comes to this kind of chaos. Give me a messy garden and a clear head — and preferably no one looking over my shoulder — and I’ll find my way through the leaves 🍃.
To be continued...

Urban Sketching Course – Week 7 : Frustration, Growth, and a Golden Tip
This week, I attended the second-to-last session of my Urban Sketching course✏️ in Rotterdam. It's hard to believe the course is nearly finished. The weekly rhythm has become familiar by now: leaving home on time, arriving with a comfortable margin, and sharing a few friendly moments with the other students before class officially starts. These small rituals give a sense of grounding before diving into the creative process.
However, I’ve noticed something curious over the past few weeks. Our group has been getting smaller and smaller. Considering that this course isn't exactly cheap💸, it's surprising to see how few people consistently show up. Of course, life happens — I myself missed one class. But with some participants, it feels like they’ve only attended two out of eight sessions. Then again, that’s not really my concern. Everyone has their reasons, and I respect that.
For our homework last week, we were asked to draw✏️ a section of the university garden🌸. Determined not to take the easy way out, I chose a challenging spot with lots of movement and texture — rustling leaves, complex forms, constantly shifting light. While I’m very comfortable with realistic drawing, trying to capture a scene that refuses to sit still proved to be a whole different experience🙄
I started with enthusiasm at home, but quickly found myself completely overwhelmed. Despite my best intentions, I only managed to complete a tiny section before I gave up😒. I simply didn’t feel like continuing — my motivation vanished. It was all just… too much. I got stuck in the details (again), something I keep struggling with.
When I brought my piece to class, I’m pretty sure my expression said it all. The instructor looked at me and immediately asked, “Not going so well?” She was right. That week’s drawing just hadn’t worked out.
As everyone’s work was discussed, I was truly impressed (and a bit jealous) of what the others had created. It’s a valuable part of the lesson, where you really learn and get to see how everyone’s personal style is developing. Then it was my turn. The teacher had even looked at my website and completely understood where I was coming from in terms of my style and background. She gave me a great piece of advice: practice more — but in small doses. Short sketching sessions, focusing on small parts. I already knew that, deep down, but it was good to hear it confirmed. And I’m definitely going to take that to heart.
I have to admit, I felt a bit embarrassed😖 that I couldn’t manage something that seemed so doable in theory. When the teacher gave her comments on my drawing, I could feel my cheeks turning red. It wasn’t harsh at all — in fact, she was very understanding and constructive — but still, it hit a nerve. I guess I had hoped to be further along by now, or at least to feel more confident in what I made.
It’s confronting sometimes, to be a beginner at something when you’re used to being good at other things. But maybe that’s exactly where the growth happens — in those uncomfortable moments where you feel exposed, uncertain, and yet… you keep going.
This week’s lesson also covered watercolor techniques — an important part of urban sketching. Luckily, not unfamiliar territory for me, but still a great opportunity to learn and explore further, it’s a skill that always offers room for refinement. The fluidity, unpredictability, and transparency of the medium are both challenging and inspiring.
The golden tip actually came from one of my fellow students:
“Try starting with aquarelle, and then add your sketch lines afterwards with a fineliner.”
Such a simple idea, but one I hadn’t considered. By laying down color first, I can loosen up, focus on shapes and atmosphere, and resist the urge to over define everything too soon. I’m definitely going to try this approach for next week’s assignment.
Conclusion:
This course continues to stretch me. I came in thinking I was here to refine what I already knew, but instead I’m learning to unlearn, to loosen up, to experiment. That’s not always easy — but it’s exactly what I needed.
To be continued...

🖋️ Wrapping Up My Urban Sketching Course week 8– What I Learned (And What I Didn’t Expect)
Today marked the final session of my 8-week Urban Sketching course in Rotterdam — and what a journey it’s been!
As always, we began by reviewing our homework.
Last week’s drawing was well received by our instructor. She especially praised my interpretation of the stone textures — done in my own way, a bit playful, a bit artistic, but effective. (See photo above☝️)
She mentioned that the windows could’ve used more contrast — darker tones with some light highlights to create more depth. But overall, I was happy with the feedback.
Then we watched a beautiful short film about Old Rotterdam in the 1930s, featuring the historical Delftse Poort (City Gate). We were asked to create a drawing🎨 based on vintage photos of that scene, and to make it look intentionally aged. That’s this week’s assignment, but honestly… I won’t be doing it. I’ve got other creative projects calling for my attention.
Looking Back: My Honest Thoughts on the Course💫
So, what’s the verdict after 8 sessions?
I’ve learned a lot — even though I already came in with some experience in drawing and composition.
My expectations were slightly different; I had hoped for more sketching “tricks” or techniques to simplify complex scenes. But to be fair, the teacher explained everything thoroughly and patiently.
Looking back, it felt more like a foundational drawing course, which actually makes perfect sense. You need a strong base if you want to go out and sketch confidently in the wild urban world.
I enjoyed it. I showed up. I tried. And I’m proud of what I made.
Sadly, the follow-up course (Aquarel & Botanical Drawing) is already full — I would’ve loved to continue right away. Maybe next year!
A big thank you to our lovely instructor for her guidance, patience, and clear explanations throughout these eight weeks. I truly appreciated the calm and supportive atmosphere she created.
And to my fellow students — it was inspiring to see everyone’s progress and unique style.
Who knows? Maybe our sketchbooks (and paths) will cross again someday.
Until then… keep drawing! ✍️✨
---
With all my love,💗
Arty by Esther


Add comment
Comments